Blog · Front Lever · 6 min read
Tuck to advanced tuck front lever: why you're stuck
The advanced tuck is three changes packed into one step. Split them apart, make sure your tuck is honest, and move on at 3 x 8 clean seconds.
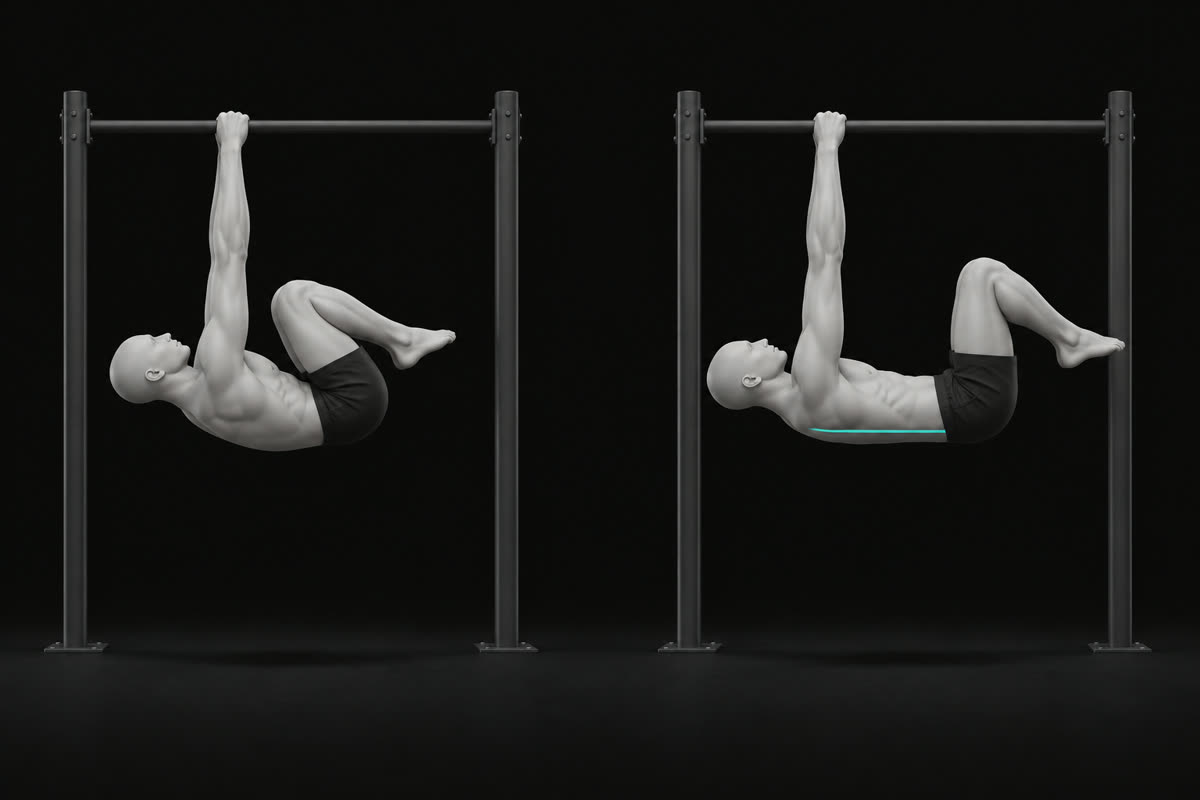
You get stuck between the tuck and advanced tuck front lever because that step changes three things at once: your back goes from rounded to flat, your hips open, and your legs move farther from the bar, lengthening the lever. Split those changes into smaller steps once your tuck holds 3 x 8 seconds clean.
It is a common complaint on r/bodyweightfitness: in one thread, an athlete holding three sets of 15 to 20 seconds in the tuck could not keep a clean advanced tuck for more than a few seconds, and a later reply described the same gap, a 15 second tuck against an advanced tuck of 1 to 2 seconds.
What actually changes between the tuck and the advanced tuck?
The tuck is a curled ball under the bar and the advanced tuck is a flat table. The grip and the straight arms stay the same, while the body gets longer and harder to hold.
| Tuck front lever | Advanced tuck front lever | |
|---|---|---|
| Back | Usually rounded | Flat, parallel to the floor |
| Hips | Fully bent, knees pulled into the chest | Opened, thighs at roughly 90 degrees to the torso |
| Knees | Tightly bent | Still bent |
| Where the leg weight sits | Close to the shoulders | Over and beyond the hips, farther from the shoulders |
| Shoulders | The curl can hide shoulders creeping toward the ears | Must stay pulled down, away from the ears, for the whole hold |
The last two rows are where the difficulty comes from. Steven Low explains in The Fundamentals of Bodyweight Strength Training that extending the body position shifts the center of mass "further away from the fulcrum", which "increases the torque". Your shoulders are the fulcrum here, and every centimeter your knees travel away from your chest adds load to the same lats.
Why does the jump from tuck to advanced tuck feel so big?
A rounded tuck lets you skip the two qualities the advanced tuck depends on: a flat back held by the shoulders and the back of the body, and pulling strength at a longer lever. You meet both on the same day.
In a tuck, curling the spine brings the legs even closer to your shoulders, and the abs and the fold carry part of the effort. To flatten the back you have to pull the shoulder blades down and hold the hips open against gravity, at the exact moment the legs move away. That is why a comfortable tuck can turn into an advanced tuck of a second or two. The strength gap is real, but part of the jump is a skill you never had to learn in the curled position.
Is your tuck front lever really a tuck?
Many long tuck holds are easier than a real tuck, so the clock overstates your readiness. Check for these five shortcuts before you blame your strength:
- Hips above the shoulders. Tilting the body up takes load off the lats.
- Bent arms. The hold turns into a partial pull-up and stops training straight-arm strength.
- Swinging in. Momentum carries the first seconds, so the count starts before you are holding anything.
- Counting from the pull. The timer should start when you are still, not when you leave the hang.
- Knees crushed into the chest with the hips high. This is the shortest lever you can make, and it hides most of the shoulder work.
Honest holds also tend to be shorter than people think. Across the scored front lever scans analyzed by CaliLens (all variations), the median hold was 5.7 seconds, below the 8 second bar used on this blog. On a tuck, the app checks the same three things you can check yourself: whether your body stays level with your shoulders, whether your arms stay locked and whether you hold still.
How do I test my tuck on video?
A side view shows everything that matters, and a front view hides most of it.
- Set the phone level at about the height of your hips during the hold, 3 to 4 meters (10 to 13 feet) away, in landscape.
- Hang, pull into the tuck, and start counting only once you are still.
- On the video, check three things: elbows fully straight, hips level with the shoulders, no swing.
- Then try to flatten your back without moving your knees. If you can hold that flat-back tuck for 8 seconds, you are ready to start opening the hips.
What are the steps between tuck and advanced tuck?
A reply in the same Reddit thread puts it well: there are countless positions between tuck and advanced tuck, and you can use them to close the gap. Change one thing at a time: flatten the back first, then open the hips a little at a time, and use negatives and short holds to meet the full shape early. Give each step 3 x 8 clean seconds before the next one becomes your main hold.
- Flat-back tuck. Knees stay in, back goes flat, shoulders pulled down. 5 x 5 to 8 seconds.
- Hips opened in stages. Let the knees drift a fist's width away from the chest, then two, then out to the full advanced tuck. Film each stage so you know where you really are.
- One-leg advanced tuck. One leg in advanced tuck, the other tucked, alternating sides. 3 x 5 to 6 seconds per side.
- Advanced tuck negatives. From an inverted hang, lower through horizontal in the advanced tuck shape over 4 to 5 seconds. 3 x 3.
- Short advanced tuck holds. 6 to 8 holds of 2 to 3 seconds with 30 to 60 seconds of rest, stopping each one as soon as the back rounds or the hips rise.
- Raises and rows. Tuck or advanced tuck front lever raises, 3 x 5, and inverted rows, 3 x 8, for pulling volume.
For the hold sets, Steven Low works at about 60 to 70 percent of the max hold, with this example: a 10 second tuck front lever max means 7 second holds. Retest your max every few weeks and adjust. A session built on this might look like:
| Block | Dose |
|---|---|
| Main hold (your current step) | 5 to 6 sets at 60 to 70 percent of your clean max |
| Advanced tuck negatives | 3 x 3, 4 to 5 seconds each |
| Front lever raises in the easier shape | 3 x 5 |
| Inverted rows | 3 x 8 |
How long does it take to go from tuck to advanced tuck?
There is no fixed timeline. As a rough estimate, a few weeks to a few months is a typical range for someone training the lever two or three times a week, and it can take longer.
Three things move that estimate. Heavier athletes and athletes with long legs carry more torque once the hips open. A tuck that was curled and high takes longer to convert than an honest one. And the flat back is a skill as much as a strength, so in practice it tends to improve faster with frequent, short practice than with rare maximal attempts. Judge progress by your clean seconds on video.
More volume does not always mean faster progress. In the thread quoted above, a reply estimated the poster's load at about 33 sets a week over three sessions, warned it might be hard to recover from, and suggested two sessions a week at most. If your holds stall while you feel beaten up, cut sets before you add them.
When should you move from tuck to advanced tuck?
Start the bridge steps when your tuck holds 3 x 8 seconds clean: arms locked, hips level with the shoulders, no swing. Make the advanced tuck your main hold once the flat-back, half-open tuck holds 3 x 8 seconds too.
Expect the first advanced tuck holds to be short, and keep the same rule to leave it: 3 x 8 clean seconds before the one leg. That longer lever is where hips start to drop, so read why hips sag in the front lever before you get there. The same move-on logic applies to every skill, as explained in when to progress in calisthenics.
Frequently asked
How long should I hold a tuck front lever before trying the advanced tuck?
Aim for 3 sets of 8 seconds with locked arms, hips level with the shoulders and no swing. Some programs ask for longer holds, but 8 clean seconds across three sets is the bar used on this blog. From there, the bridge steps do more for you than a longer tuck.
Should my back be rounded in a tuck front lever?
A rounded back is common and accepted in a standard tuck. The advanced tuck needs a flat back, though, so learn to hold the tuck with a flat back before you open the hips. That single change is often the hardest part of the jump.
Is the one leg front lever easier than the advanced tuck?
No. The one leg front lever usually comes after the advanced tuck, because the straight leg reaches even farther from the bar. Do not confuse it with the one-leg advanced tuck (one leg in advanced tuck, the other tucked), which is a bridge step between the tuck and the advanced tuck.
Can I use a resistance band to learn the advanced tuck?
Yes. A light band under the hips lets you practice a flat back and open hips at full length. Pick the thinnest band that keeps your line, and keep some unassisted work, such as flat-back tuck holds and negatives, in the same session.
Why do my hips rise in the tuck front lever?
Tilting the body up makes the hold easier, so it happens on its own when the pull is near its limit. Lower the hips to the height of your shoulders and accept a shorter hold. A higher tuck does not build the strength a level one does.