Blog · Handstand · 8 min read
Chest-to-wall handstand: setup, hold times and fixes
The wall should not just hold you up. Face it, bring your hands close, and it starts showing you where your line bends.
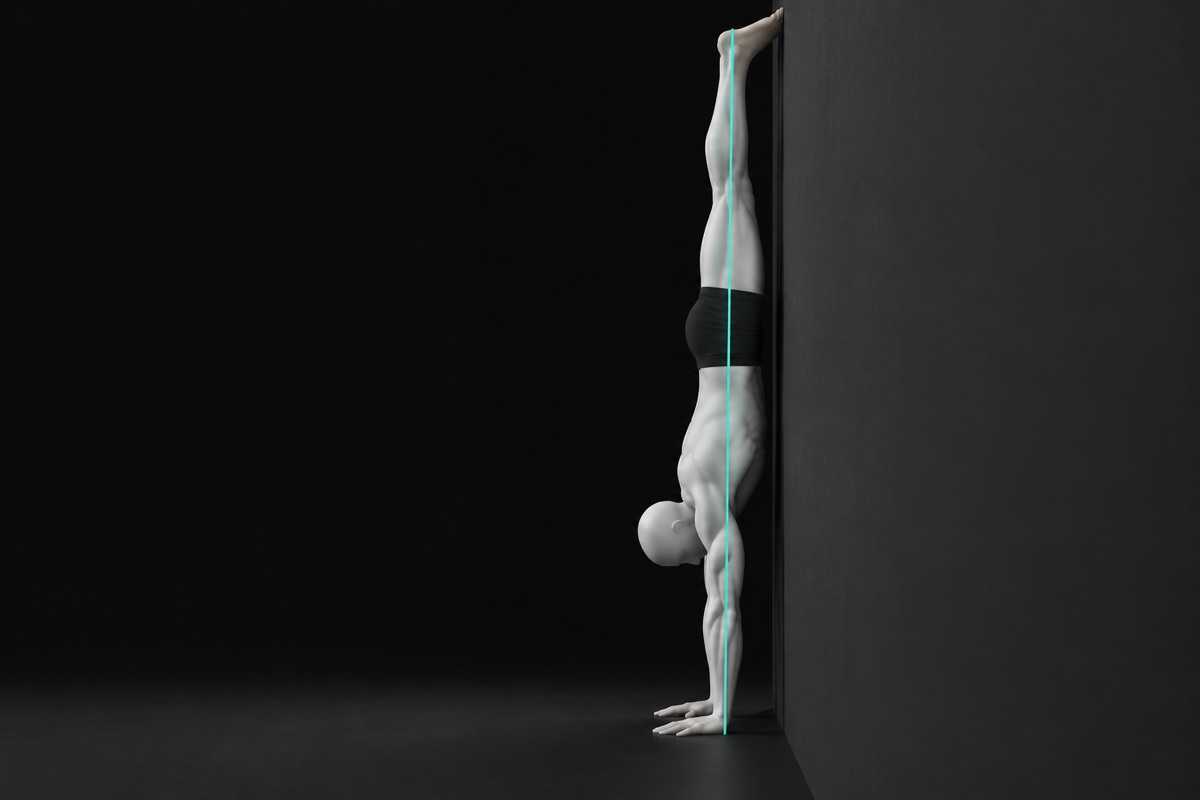
The chest-to-wall handstand is the best wall drill for a straight handstand. You face the wall, walk your feet up it, bring your hands close, and push tall until only your toes touch. With your hands close to the wall, there is no room for your hips to sag into an arch, so the drill teaches open shoulders and one straight line from wrists to toes. Start with your hands about 30 cm (12 inches) from the wall, hold 3 to 5 sets of 20 to 30 seconds, and move closer as the line gets cleaner.
It is also the drill most people put off, because facing the wall feels scarier. In a thread on why stomach-to-wall handstands feel scarier, a beginner said hands close to the wall made them fear falling backward. Replies said that is normal, and that learning to turn out of it is the fix.
Why practice chest to wall instead of back to wall?
Because chest to wall makes you build the straight line, while back to wall lets you skip it. With your back to the wall, your hands sit away from it and your heels rest on it, so your body can bend in the middle and still stay up. The usual result is a banana: lower back arched, ribs flared, shoulders closed.
Facing the wall flips that. With your hands close and only your toes on the wall, you have to stack your hips over your shoulders and open your shoulders fully. In a thread comparing the two, the top reply said back to wall helps early on to get used to being upside down, while stomach to wall is the better step toward freestanding because it refines the straight line without the arch.
Good handstands tuck the pelvis. In an X-ray study of 19 national-level gymnasts, most tilted the pelvis backward in the handstand and had less lower back curve than when standing (Eyssartier and colleagues, 2024). Squeezing your glutes at the wall trains that shape. If you arch on every attempt, run the two tests in how to fix a banana handstand to see whether shoulders or habit is the cause.
How do you walk up the wall safely?
Clear the floor, use a smooth wall, put a mat under your hands, and warm up your wrists for about 5 minutes. The routine is in wrist pain in push-ups and handstands.
- Start in a push-up position with your feet against the bottom of the wall and your arms straight.
- Walk your feet up the wall one small step at a time, until your hips are higher than your shoulders.
- Walk your hands toward the wall in small steps as your feet climb. Keep the arms locked on every step.
- Stop at your distance, about 30 cm (12 inches) from the wall on your first sessions.
- Push tall and set the line: ribs in, glutes squeezed, toes pointed.
The first few times, stop halfway, at about 45 degrees, and hold 10 to 20 seconds.
How do you come down from a chest-to-wall handstand?
Walk down the way you came: hands step away from the wall, feet follow, back to a push-up position, then knees down. Start while your arms are still strong, because shaking arms on the way down are the real risk.
The emergency exit is the cartwheel bail: shift your weight onto one hand, turn your hips a quarter turn, and let your feet come down to the side. Several replies in the scary-wall thread pointed to this turn-out, the pirouette bail. Practice it before you go close:
- From a squat with your hands on the floor, hop your feet up and land them to one side of your hands. 5 per side.
- Walk halfway up the wall, lift one hand, turn and step down to the side. 5 per side.
- Repeat from higher until you can turn out of a full wall handstand in both directions.
How far should your hands be from the wall?
Start further, then move closer. The goal is about a hand's width, 10 to 15 cm (4 to 6 inches), with only your toes touching the wall.
- Week 1: about 30 cm (12 inches). A slight angle is fine.
- Every week or two: move 5 cm (2 inches) closer, but only if your line stays straight and your arms stay locked for every set.
- Target: a hand's width. There you cannot stay up without open shoulders.
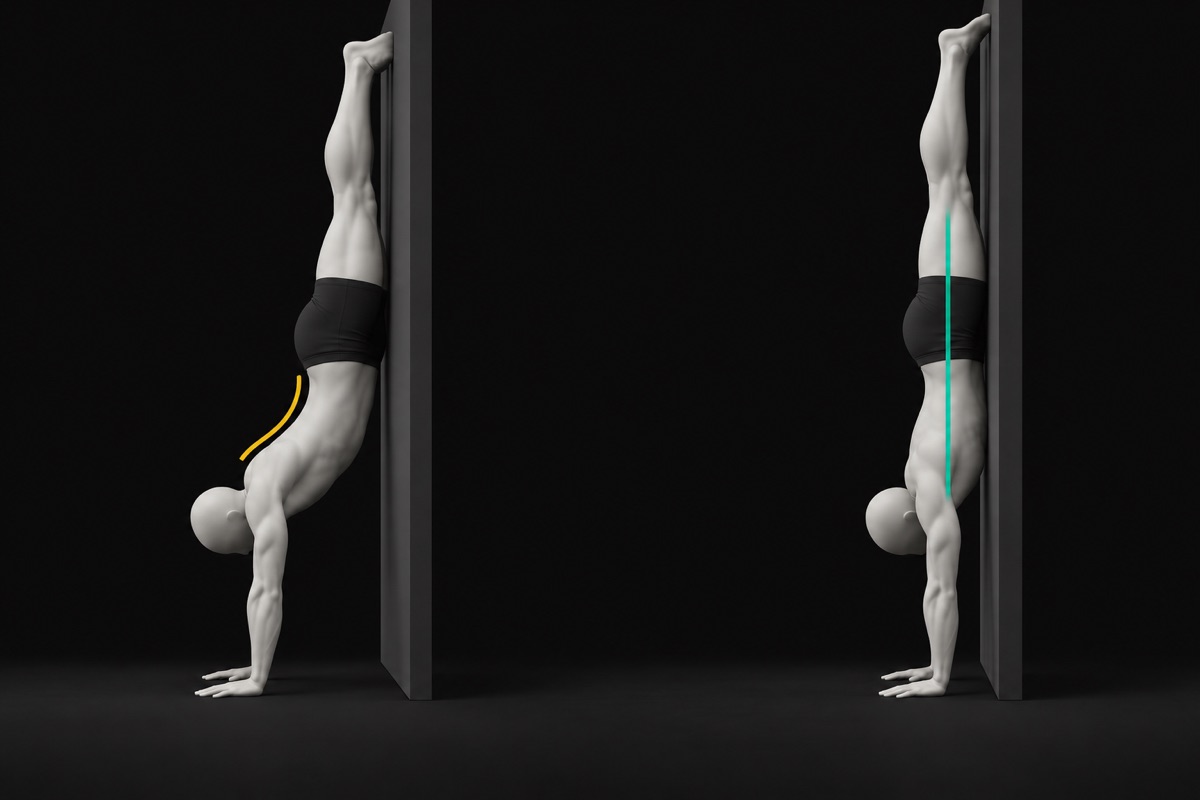
In a thread from someone whose lower back kept curving into a C at the wall, the top reply said the same: hands as close as possible to force the line straighter, because shoulders that do not open enough are a main reason people arch.
What should a straight wall handstand feel like?
Tall and tight, as if your toes were reaching for the ceiling. Run the cues from the hands up:
- Push tall through the shoulders. Press the floor away until your shoulders are close to your ears. Arms locked.
- Ribs in. Pull your lower ribs toward your hips, the same shape as a hollow body hold.
- Glutes and legs squeezed. Squeeze your glutes, press your legs together, lock your knees.
- Pointed toes. Only the tops of your toes touch the wall.
- Head neutral. Ears between your arms. Look with your eyes, not your neck.
A 2025 review of handstand biomechanics found that head position affects balance and that bending the neck forward made performance worse (MacDonald and colleagues). Keep your head as you would standing tall.
What are the most common chest-to-wall handstand mistakes?
Most of these let the wall do the work.
Hands too far from the wall. The body slants like a steep plank, and the shoulders carry you at an angle.
- Cue
- Hands one step closer than feels easy.
- Why
- Far hands keep the shoulders closed and turn the drill into a lean, so it never teaches the stacked line.
- Drill
- Tape a mark 5 cm (2 inches) closer than your usual spot. Hold 3 x 15 seconds there.
Banana back. The belly and hips sink toward the wall and the lower back arches.
- Cue
- Ribs in, glutes tight, belly off the wall.
- Why
- The arch replaces open shoulders, and the habit follows you off the wall.
- Drill
- Hollow body holds, 3 x 20 seconds, then 3 x 20 seconds at the wall squeezing a yoga block between your ankles.
Shoulders not open. The arms stay angled in front of the head instead of in line with the body.
- Cue
- Shrug your shoulders toward your ears and push the floor away.
- Why
- Closed shoulders are one of the main reasons the body bends elsewhere to stay up.
- Drill
- Wall shrugs: sink a little, then push as tall as you can. 3 x 8 slow reps.
Looking at the floor. The head comes out between the arms to look at the floor or the hands.
- Cue
- Ears between the arms.
- Why
- Craning the neck pulls the upper back into an arch and makes the shoulders close.
- Drill
- Hold 3 x 20 seconds looking at the wall in front of your nose.
Bent elbows. The arms soften as you get tired, and the head sinks toward the floor.
- Cue
- Lock the elbows and keep them locked.
- Why
- Soft elbows shift the load to the triceps, shorten the hold and make the walk down less safe.
- Drill
- End each set as soon as the elbows bend. If that happens before 15 seconds, build pressing strength with pike push-ups, 3 x 8, 2 to 3 times a week.
If your wrists, shoulders or lower back hurt, come down and stop for the day. Sharp pain, pain that lasts into the next day, numbness or tingling in the hands, or a headache that starts while upside down: see a physiotherapist or doctor before going back up.
How long should you hold a wall handstand, and how often?
Train 3 to 5 sets of 20 to 30 seconds, 3 or 4 times a week, with 1 to 2 minutes of rest between sets. Count only the seconds where the line stays straight. When the arch comes back or the elbows bend, the set is over.
- Beginner: 3 x 10 to 20 seconds at about 30 cm (12 inches), or halfway up if the full wall is too much.
- Building: 4 x 20 to 30 seconds, moving the hands closer every week or two.
- Ready: 3 x 30 seconds with the hands about a hand's width from the wall, line straight, arms locked.
Do it early in the session, while your shoulders are fresh. Your wrists set the pace: in a 2025 survey of 321 adults who practice handstands, more than half reported chronic wrist pain (Martonovich and colleagues). Add time slowly, a few seconds per set each week.
How do you start balancing off the wall?
Use the wall less, one drill at a time. Both of these need the close hand position, so start them once you hold 30 seconds at about a hand's width.
- Shoulder taps. Shift your weight onto one hand, lift the other and tap your shoulder, then put it back. Keep your hips still. 3 x 5 taps per side.
- Toe pulls. Shift a little pressure into the heels of your hands to float your toes 1 to 2 cm (half an inch) off the wall. Then catch the balance with your fingertips before you tip away from it. Start at 2 to 3 seconds, build to 10. 5 to 8 attempts.
Those two pressures, heels of the hands and fingertips, are what keep you up freestanding. The full method is in how to balance a handstand without the wall.
When should you move to freestanding handstand work?
When you can hold 3 x 30 seconds chest to wall with your hands about a hand's width from it, a straight line from the side, and when you can cartwheel out to both sides. Then keep 2 or 3 wall sets as a line warm-up and spend the rest on kick-ups and freestanding attempts.
Check the line on video, not by feel. In the C-shaped back thread, one reply suggested filming from the side while saying out loud what you think you are doing, because upside down, feel and reality differ. Put the phone at hip height, 2 to 3 meters (7 to 10 feet) to the side, with your whole body in frame. Once you leave the wall, CaliLens can score your freestanding handstand from that same side view. For light and framing, see how to film a calisthenics form check.
Frequently asked
Is back to wall ever useful?
Yes, for kick-up practice and for getting used to being upside down when chest to wall still feels scary. Kicking into the wall teaches you how much force reaches vertical. Just do not use it as your main hold, because the wall lets your lower back arch without telling you.
Should my whole body touch the wall?
No. Mostly your toes, plus at most a light touch of the chest once your hands are very close. If your belly and hips press flat against the wall, you are leaning on it. Push tall until the contact is light.
Is it normal to feel scared of falling off the wall?
Yes, chest to wall feels scarier than back to wall at first, because the open side is behind you. Practice the cartwheel exit from low heights until it feels automatic. Most of that fear fades once you know you can turn out and land on your feet.
Can I do wall handstands every day?
Short, easy holds can work daily if your wrists and shoulders stay comfortable the next morning. For most people, 3 or 4 sessions a week is enough. If your wrists start to ache, drop a session and warm them up longer before the next one.
Do chest-to-wall handstands build strength for handstand push-ups?
They build the straight-arm shoulder strength and the line you need at the top of every rep. They do not train the press itself. Pair them with pike push-ups and, later, wall handstand push-up negatives.