Blog · Form check · 7 min read
How to film yourself for a calisthenics form check
A form check is only as good as the clip. Most unreadable videos fail on the same few points, and every one of them can be fixed before you press record.
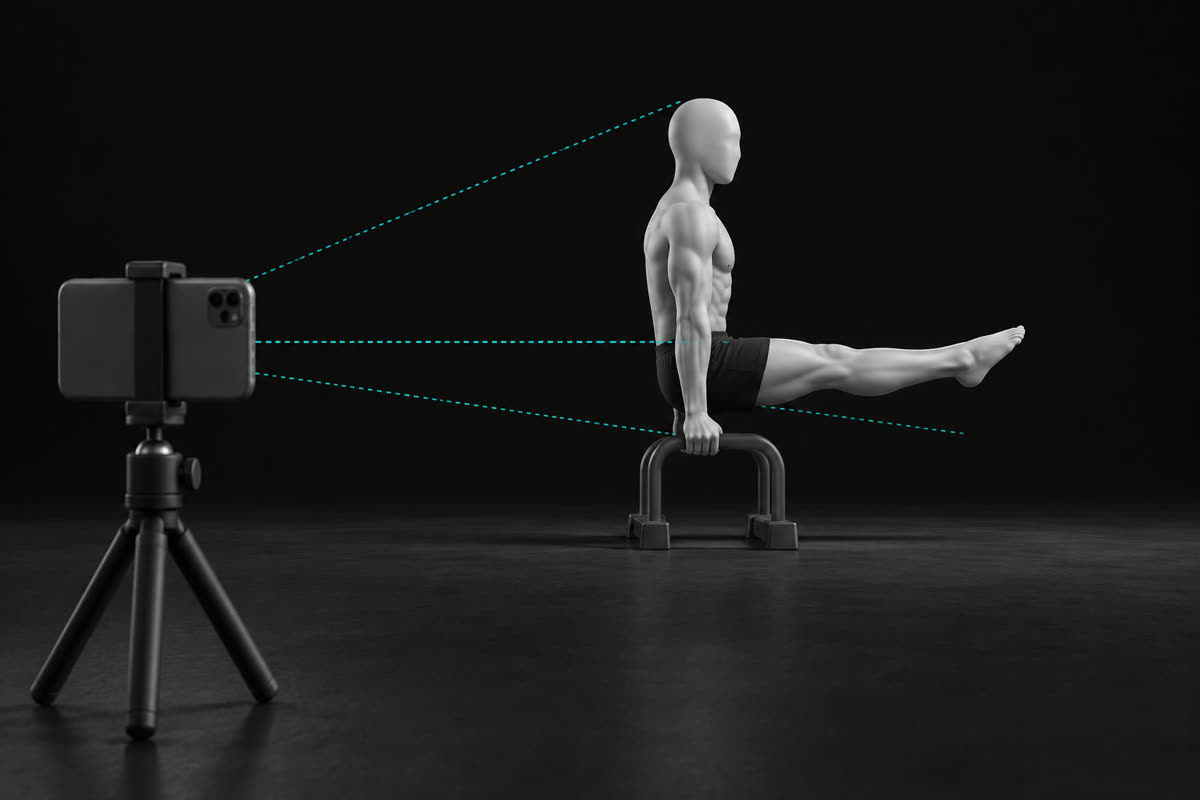
To film a calisthenics form check, prop your phone somewhere stable 2 to 3 meters away, at about hip height, and film most skills from the side with your whole body in frame, hands and feet included, for the entire set. Keep the light in front of you, record at normal speed, and hit record before you get into position.
The shot decides whether anyone (you, a coach or an app) can judge the rep. Among new CaliLens users, 30 percent had a very first scan that could not be scored. Of the scans that could not be scored, 57 percent never showed the selected skill as a valid hold or rep, 28 percent lost the body or the legs out of frame, and 14 percent gave no usable body tracking at all.
Filming is the usual answer to a common complaint on r/bodyweightfitness, from people who train alone, with no mirror, and cannot tell whether their form is right. One reply sums up the fix: prop the phone against a water bottle, watch the set back, and you will spot things you never feel while doing it.
What makes a form check video unreadable?
The setup, almost never the phone. These are the usual culprits:
- Hands or feet cut off. Without the wrists and ankles there is no body line to judge, and depth or lockout cannot be read.
- The wrong angle. From the front, a hip sag or an elbow angle disappears. From a slant, angles look bigger or smaller than they are.
- Backlight or a dark room. A window behind you turns your body into a silhouette.
- A moving phone. Handheld footage, panning or zooming changes the reference in every frame.
- An incomplete attempt. The recording starts after you are already in position, or stops before the last rep ends.
- Too far away. A small figure in a wide shot leaves only a few pixels for each joint.
- A second person or baggy clothes. Someone walking through the shot confuses tracking, and a loose hoodie hides where the hips and shoulders are.
Angle problems also hide inside clips that look fine. Among scored CaliLens scans, 8 percent were filmed from an angle too oblique to trust every measurement.
Where should you put your phone?
Two to three meters away, square to the movement, at the height of the part of your body that matters most. The phone must not move.
- Distance. Start at 2 to 3 meters. Step it back if your hands or feet leave the frame at the highest or lowest point, as they often do in a muscle-up or a handstand kick-up.
- Height. Hip height for most holds. Floor level for push-ups and handstand push-ups, so the camera does not look down on the body line. Chest height for pull-ups, bar height for muscle-ups.
- Level. Keep the phone upright and straight. A tilted frame makes a flat body look slanted.
- Support. A small tripod, a water bottle, a shoe or a bag against a wall. Anything that stays put.
Should you film from the side or the front?
From the side for almost every calisthenics skill, because most of them bend and straighten in that plane: hips, elbows, shoulders and knees. A front view only helps for skills that face the camera, or to check left-right symmetry.
Research on 2D video points the same way. In a validation study of 2D video analysis software, measurements held up with the camera anywhere from 90 to 45 degrees to the movement, but the authors recommend 90 degrees, straight side-on, for the best results (Puig-Diví and colleagues, 2019). A 2021 study of falls filmed on standard video found horizontal velocity errors 2.5 times higher with the camera at 30 degrees than at 90 degrees (Shishov and colleagues). And a 2023 review of 2D video analysis in running found it reliable but advises particular caution with joint angles in the frontal and transverse (rotation) planes (Leporace and colleagues).
Use a front or three-quarter view as a second, separate clip when the question is symmetry: one arm turning over first in a muscle-up, elbows flaring in push-ups, legs drifting apart in a handstand.
Which camera angle for each calisthenics skill?
These are the angles CaliLens asks for on the skills it scores. They work just as well for a coach. Dips are not scored in the app; the last line is a setup that works well for them.
- Front lever, front lever touch, back lever, planche and L-sit. Side view, camera at hip height.
- Handstand. Side view, the whole body from hands to feet in frame.
- Push-ups and handstand push-ups. Side view, camera at floor level, full body visible.
- Pull-ups. Three-quarter view, camera at chest height, feet in frame. You see the chin clear the bar and any swing, which a straight front view hides.
- Muscle-ups. Side view, camera at bar height, full body visible.
- Human flag. Front view, full body visible, since the body line runs across the camera from there.
- Dips. Side view, camera at hip height, whole body visible.
Should you film in landscape or portrait?
Match the phone to the shape of the skill, so your body fills as much of the frame as possible. Landscape suits horizontal skills: levers, planche, push-ups and the L-sit. Portrait suits vertical ones: handstands, handstand push-ups, pull-ups, muscle-ups and dips. Either way, check that the extreme points still fit, such as the feet at the top of a kick-up or the hips above the bar in a muscle-up.
What frame rate and resolution should you use?
Your phone's standard video setting is enough: 1080p at 30 frames per second covers holds and controlled reps. The falls study above measured body positions to within 9 percent from 30 frames per second footage at 640 x 480 pixels, far below what a recent phone records.
- 60 frames per second helps a coach pause on the exact bottom or top of fast reps, such as a kipping pull-up or a muscle-up transition.
- Slow motion is rarely worth it. Each frame gets less light, so indoor clips turn dark and grainy, and the real timing of a hold is harder to read.
- 4K mostly adds file size. It does not make a form check more readable.
How should you light the shot?
Face the light or have it come from the side. Never film with a bright window or a lamp directly behind you.
- Outdoors, keep the sun behind the camera or to one side, not behind you.
- Indoors, switch the room light on and open the blinds on the camera's side.
- Background, plain and in contrast with your clothes, so your outline stands out.
- Clothing, fitted enough to show the hips, knees and elbows.
How do you get a complete, steady clip?
Press record first, then get into position, and stop only once you are back on your feet.
- For a hold, film the whole attempt, entry to exit, and stay in the position for at least a couple of seconds after you feel set.
- For reps, film the full working set. Most faults appear in the last reps.
- No zooming or panning. If you need a closer shot, move the phone.
- Keep training partners out of the frame.
- Mark the phone's spot with tape, so every weekly clip has the same angle and distance.
How do you check your own form from the clip?
Test the frame before the set, then judge key frames, not the whole video at full speed.
- Record 3 seconds in position and watch it. Your hands, feet and head should stay inside the frame.
- After the set, pause on the key frames: the lowest and highest point of each rep, or the first, middle and last second of a hold.
- On each frame, check the line from shoulders to ankles and the elbow angle against the standard for the skill.
- Compare the first rep with the last. Most faults only show up once you are tired.
The skill-specific standards are in the push-up form check and the handstand balance test, and the rule for turning a clean set into a harder variation is in when to progress in calisthenics. If you would rather have the clip read for you, CaliLens analyzes the same video on your phone and rates the capture quality, so you know when the shot itself limits the result.
How do you film for an online coach?
Send what the coach would see standing next to you: an untouched clip of a real set, from the angle they asked for.
- Raw footage. Normal speed, no filters, no sped-up edit, no highlight cut.
- One clip per angle. If they want side and front, film two separate sets rather than moving the phone mid-set.
- A real working set, last reps included.
- Context in writing. The variation, the set number, and anything you felt, such as wrist or lower back discomfort.
If a movement hurts, stop the painful variation and see a physiotherapist if the pain persists.
Frequently asked
What is the best camera angle for a calisthenics form check?
Straight from the side for most skills, with the phone square to the movement. Pull-ups are easier to judge from a three-quarter view at chest height, and the human flag from the front. Add a front clip only when you want to check left-right symmetry.
How far away should my phone be when I film my workout?
About 2 to 3 meters is a good start. Your whole body, hands and feet included, should stay in frame at the highest and lowest point of the movement, with a little margin. If you look tiny in the shot, move the phone closer rather than zooming.
Should I film my form check in slow motion?
Usually not. Normal speed at 30 or 60 frames per second is enough, and slow motion gives each frame less light, so indoor clips get dark and grainy. If a coach wants to study a fast movement, 60 frames per second at normal speed lets them pause on any moment.
Can I check my form from a front-facing video?
Only for what shows from the front: symmetry, elbow flare, legs drifting apart. Hip sag, depth, lockout and body line are judged from the side, and a front view hides most of them.
How do I film myself without a tripod?
Lean the phone against a water bottle, a shoe, a bag or a wall, on a surface at the height you need. Anything works as long as it does not move during the set. Mark the spot with tape so next week's clip matches.