Blog · Planche · 8 min read
Frog stand to tuck planche: setup, faults and next steps
The frog stand teaches you to trust your hands. The tuck planche asks your locked arms to carry you. The steps in between are where most of the work happens.
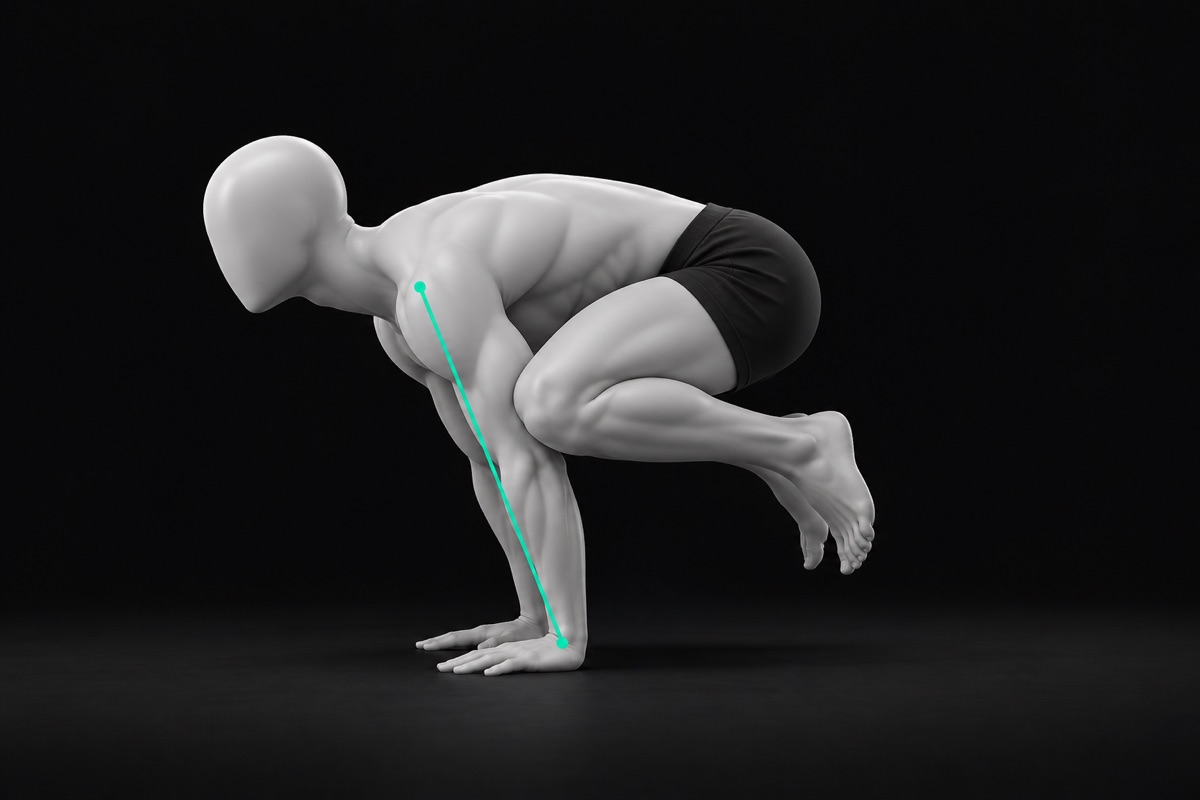
A frog stand is a balance on your hands with your elbows bent and your knees resting on the backs of your upper arms. Get into it by leaning forward slowly until your feet float, not by jumping. It is the first step toward the planche, but it is not a tuck planche: the tuck locks your elbows, lifts your knees off your arms and holds your hips at shoulder height. Between the two sit planche leans, the straight-arm frog stand and short tuck holds.
In Steven Low's Overcoming Gravity progression charts, the floor planche line starts with the frog stand at level 3, then the straight-arm frog stand at level 4, then the tuck planche at level 5. The frog stand earns its place because it teaches you to put your weight in front of your hands. Most of the strength comes later.
Is a frog stand the same as crow pose?
Almost. Crow pose is the yoga name, and teachers often place the knees high on the backs of the upper arms, close to the armpits. In calisthenics, "frog stand" covers that shape and a version with the knees on the outside of the elbows. Both are bent-arm balances where your legs rest on your arms. Pick the one that feels most stable and keep it.
How do you do a frog stand, step by step?
Set the shelf, then lean. The lean is what lifts your feet.
- Squat down with your feet together and your knees wide.
- Place your hands shoulder width apart, about 30 cm (1 foot) in front of your feet. Spread your fingers wide and point your index fingers forward.
- Bend your elbows straight back, not out to the sides, so your forearms stand close to vertical over your hands.
- Rest your knees on the backs of your upper arms, just above the elbows. Squeeze them in so they do not slide off.
- Look at a spot on the floor about 30 cm (1 foot) in front of your fingers, not between your hands.
- Lean forward slowly until your shoulders pass your hands and your feet get light. Lift one foot, then the other.
- Steer with your fingers. Press your fingertips down when you tip forward, ease off when you tip back.
That last step is the whole skill. In a thread from a beginner who kept falling forward onto their head, several replies gave the same fix: press your fingertips into the ground. One compared it to the way your toes catch you when you rise onto the balls of your feet.
What are the common frog stand faults?
Four faults stop most beginners. They often come in pairs: fear of falling makes you lean less, and narrow hands make the knees slip.
Not leaning enough. Your feet stay glued to the floor, or you hop them up and drop back down.
- Cue
- Shoulders past your hands, then the feet leave on their own.
- Why
- Your feet only float when your weight sits over your hands. Hopping skips the lean, so you land behind the balance point and fall back.
- Drill
- Toe-tap leans: in the setup, lean until your toes barely touch, hold 5 seconds, come back. 3 x 5 reps.
Fear of falling forward. You stop the lean just short of the balance point because tipping onto your face feels likely.
- Cue
- Fingertips are your brakes.
- Why
- Once you trust your fingers to stop the tip, the lean gets longer. A soft landing removes the fear while you learn.
- Drill
- Put a pillow or a folded mat in front of your hands. Lean in, then deliberately press your fingertips to stop the tip, 5 times per session.
Hands too narrow. The hands sit close together, the elbows flare, and the knees slide off the arms.
- Cue
- Hands under your shoulders, elbows pointing back.
- Why
- A shoulder-width base gives your knees a flat shelf on each arm. In a thread from a beginner whose knees kept slipping, replies pointed to the same two details: forearms vertical over the hands, and knees that are not set too wide on the arms.
- Drill
- Set up in front of a mirror or a phone. Check that each forearm is vertical before you lean. A yoga block under your feet makes it easier to reach the arms.
Wrists hurting. The frog stand puts your weight on a bent-back wrist, often for the first time.
- Cue
- Grab the floor with your fingers.
- Why
- Pressing through the fingers moves part of the load off the heel of the hand. A short warm-up and a slow start give the wrist time to adapt.
- Drill
- Wrist rocks on hands and knees, 2 x 10, before every session. If the floor still bothers you, use parallettes or fists. The full routine is in wrist pain in push-ups and handstands.
Stop if the pain is sharp, climbs during the set or is worse the next morning. See a physiotherapist or doctor for pain that lasts more than a week or two after you cut the load, swelling, numbness or tingling in the hand, or pain at one spot after a fall onto your hand.
Why is a frog stand not a tuck planche?
Because the frog stand rests on your arms and the tuck planche hangs from them. They look similar from a distance, but four details change everything.
- Arms. Bent in the frog stand, locked straight in the tuck planche.
- Knees. Parked on your arms in the frog stand. Floating in the tuck, pulled to your chest and touching nothing.
- Upper back. Often loose in the frog stand. Rounded in the tuck, with the shoulder blades pushed apart (protracted) so the chest does not sink.
- Hips. Usually above the shoulders in the frog stand. Level with the shoulders in a good tuck planche, which needs a bigger lean.
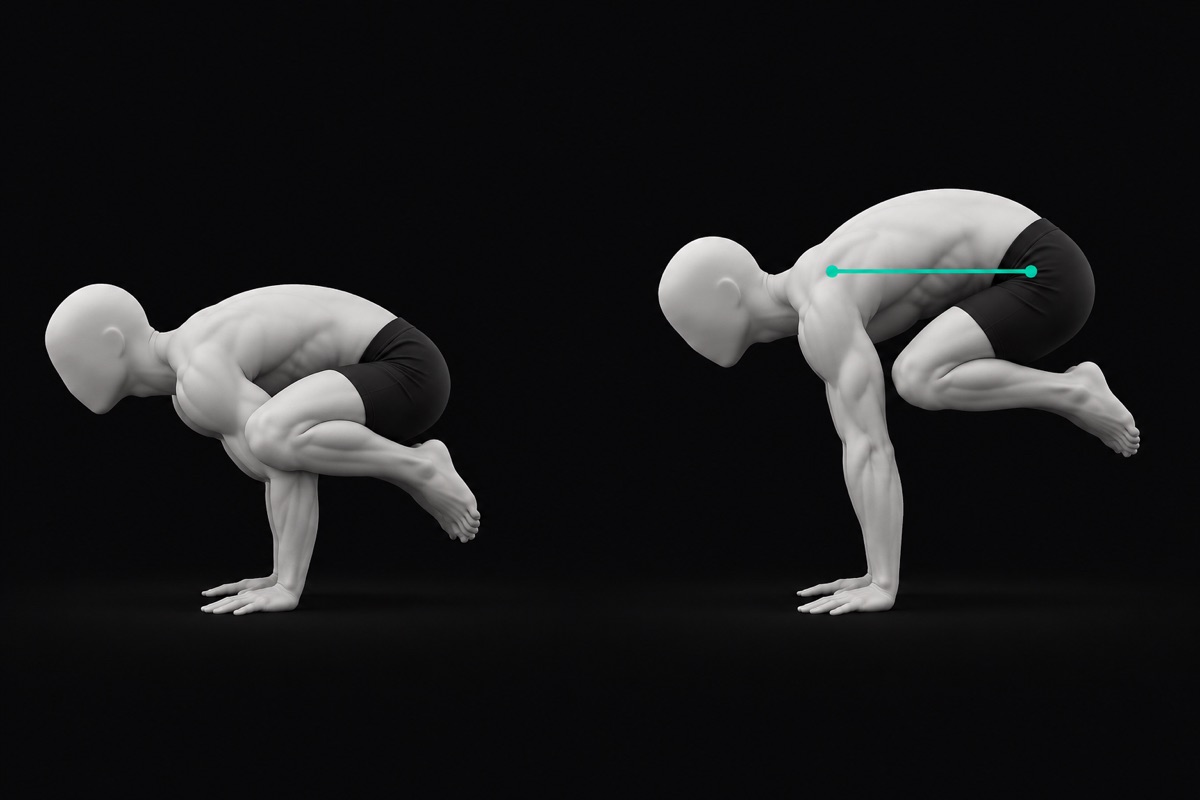
The bent elbows are the big difference. Steven Low writes, in a post on planche plateaus, that there is a huge difference between locked arms and slightly bent arms, and that someone who cannot lock out may need to go back and rebuild the positions. A frog stand you can hold for a minute says little about your tuck planche.
How do you get from frog stand to tuck planche?
Build the straight-arm lean, then take the knees off the arms one at a time. Run these in parallel, two or three times a week.
- Planche leans. Feet on the floor, elbows locked, shoulders pushed away from the floor, lean until your shoulders pass your fingers. 3 x 10 to 15 seconds. Pseudo planche push-ups train the same lean with reps, as explained in pseudo planche push-ups.
- Straight-arm frog stand. Set your knees on the outsides of your arms near the elbows, lock the elbows, push the floor away and lean until your feet float. Expect a much bigger lean than the bent-arm version. 3 to 5 x 10 seconds.
- One knee off. From the straight-arm frog stand, lift one knee off its arm toward your chest for 2 to 3 seconds, put it back, then the other. 3 x 3 per side.
- Tuck planche on parallettes. Parallettes give your feet room and keep your wrists straighter. From a support, round your upper back, pull both knees to your chest and lean until your feet leave. Start with holds of 2 to 5 seconds.
- Hollow body hold. 3 x 20 seconds with the ribs down and the pelvis tucked. It teaches the rounded, tight trunk the tuck needs, as covered in the hollow body hold guide.
Static work alone can stall here. In a thread about moving from an advanced frog stand to the tuck planche, one reply said a first tuck planche is very hard to reach through frog stand holds only, and suggested dynamic reps on parallettes, 3 x 8 to 10, with the hips high and the arms straight. Another reply suggested bent-arm tucks on parallettes first. They can teach the tuck shape, but count only the seconds with locked elbows as tuck planche.
How many sets, and how long should you hold?
Hold short and often. A balance skill improves with clean practice, not with grinding.
- Frog stand: 5 to 8 attempts per session, each up to 10 to 30 seconds. Stop the attempt when your form breaks, not when you fall.
- Straight-arm steps and the tuck: Steven Low programs isometrics at about 60 to 70 percent of your best hold in his Prilepin tables for bodyweight work. If your best clean tuck is 6 seconds, do 6 sets of 4 seconds.
- Rest: about 2 minutes between straight-arm holds, so every set starts fresh.
- Frequency: 2 to 3 sessions a week, with a day off between them for your wrists.
Move from the frog stand to the straight-arm version once you hold 3 x 30 seconds with calm breathing and no hops. Move from the straight-arm frog stand to the floating knees once you hold it 3 x 10 seconds with the elbows locked the whole time. These are coaching gates, not laws, but they stop you from rushing a step your wrists are not ready for.
When is your tuck planche ready?
When your knees float, your elbows stay locked and your back stays level, all at once, for a few seconds. Film it from the side, with the phone at hip height 2 to 3 meters (7 to 10 feet) away, and check three frames: the start, the middle and the end.
- Elbows straight in every frame.
- Knees clear of your arms in every frame.
- Shoulders in front of your hands, upper back high.
- Hips at shoulder height, not sagging toward your hands.
If the knees touch down or the elbows bend, that set was a frog stand. If everything else is right but the hips sit low, that is the next problem, and tuck planche hips too low covers how to lean far enough. CaliLens scores the tuck planche from a side video, so you can check whether the hold counts once your knees leave your arms. Aim for 3 x 8 seconds with all four checks before the advanced tuck.
Still deciding whether the planche should be your first big static? Read front lever or planche first, especially if your wrists are sensitive.
Frequently asked
Is crow pose the same as a frog stand?
Close enough to train the same way. Yoga teachers often place the knees high on the backs of the upper arms in crow pose, while calisthenics coaches call almost any bent-arm balance with the knees on the arms a frog stand. What matters for the planche is the next step: locking the elbows.
Should my arms be straight in a frog stand?
Not at first. The bent elbows make a shelf for your knees, which is what makes the frog stand a beginner balance. Once you can hold it calmly, the straight-arm version becomes your next exercise and the bridge toward the tuck planche.
Can I skip the frog stand and go straight to planche leans?
Yes, if you already balance comfortably on your hands from other training, such as handstands. Planche leans build the straight-arm strength the tuck needs. The frog stand mostly teaches you not to fear tipping forward, and a few sessions are often enough for that.
Does a frog stand build planche strength?
A little, but not much. With bent arms and the knees resting on them, the shoulders do far less work than in a tuck planche. Treat it as a balance and wrist preparation step, and let leans and straight-arm holds do the strength work.
Are parallettes better than the floor for the frog stand?
They help if your wrists complain, because the grip keeps the wrist straighter. They also make falling forward a little scarier at first. Learn the balance on the floor with a cushion in front of you, then use parallettes for the straight-arm steps.