Blog · Front Lever · 8 min read
Front lever progression: every step from tuck to full
The road to a full front lever is long and mostly quiet work. Here is the whole map, so you always know where you stand, what comes next and what tends to go wrong.
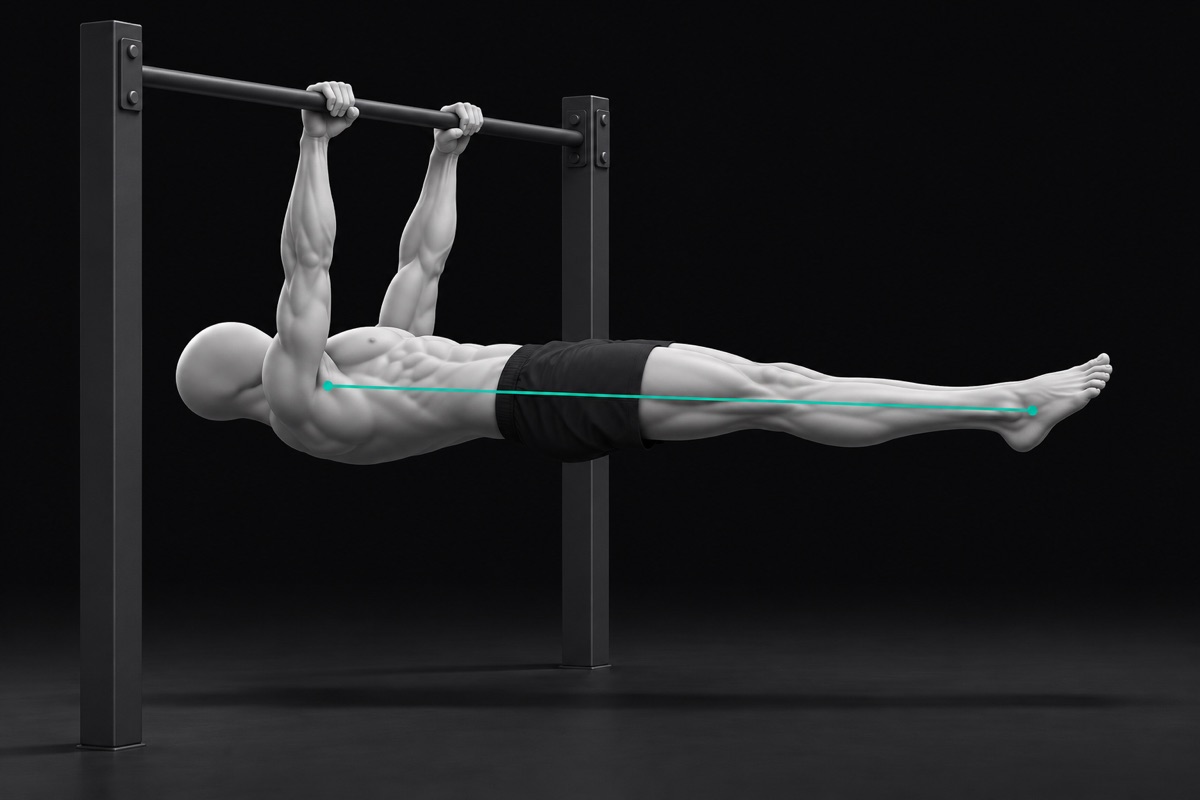
The front lever progression has five steps: tuck, advanced tuck, one leg, straddle, full. Own each one for 3 sets of 8 clean seconds before you make the next one your main hold. Clean means locked arms, hips level with your shoulders and no swing. From a solid pull-up base, expect many months, and quite often a few years, to reach the full hold.
The 3 x 8 gate is the bar used on this blog, explained in when to progress in calisthenics. It is not universal. The r/bodyweightfitness Recommended Routine asks for 3 x 30 seconds on its static holds, the tuck front lever included. In a thread on when to leave the advanced tuck, one reply called 15 seconds plenty. Longer holds are fine, but not required.
What are the front lever steps, in order?
Each step moves the weight of your legs farther from your shoulders. Steven Low explains in The Fundamentals of Bodyweight Strength Training that this raises the torque on the joint. The same lats and shoulders have to hold a longer lever.
| Step | What it looks like | What changes | Own before moving on |
|---|---|---|---|
| Tuck | Knees pulled to the chest, back rounded | Shortest lever, legs close to the shoulders | 3 x 8 seconds |
| Advanced tuck | Back flat and level, hips bent with the thighs angled up from the hips toward the bar, knees bent | The back stops helping and the legs move away from the chest | 3 x 8 seconds |
| One leg | One leg straight, the other bent with the knee pulled up | One full leg length now sits far from the shoulders | 3 x 8 seconds per side |
| Straddle | Both legs straight and spread wide | Both legs are long, and only the width shortens the lever | 3 x 8 seconds, legs closing over time |
| Full | Legs straight and together, one line from the shoulders to the ankles | The longest lever, with nothing left to shorten it | The goal, then build toward 3 x 8 seconds |
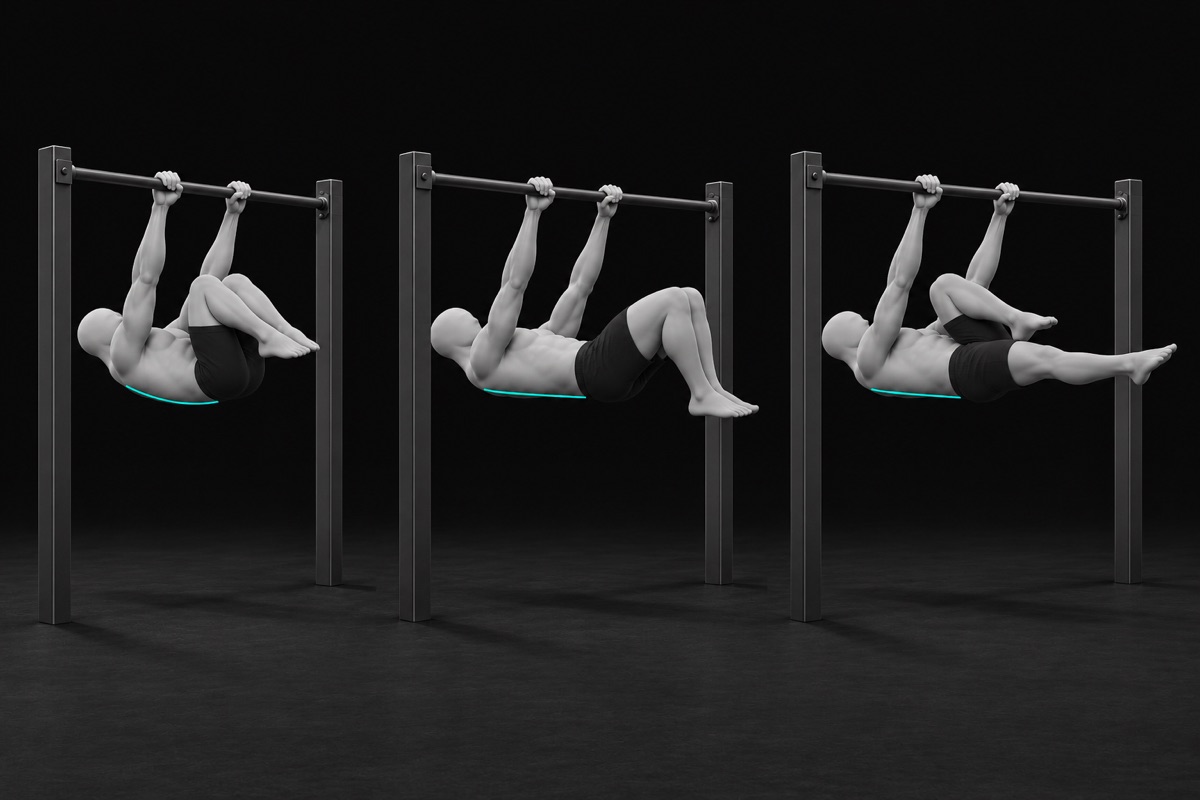
The middle of the ladder is not fixed. The Overcoming Gravity charts place the straddle at level 6 and the one leg at level 7, while many athletes do it the other way round. One detailed account of reaching the full lever calls advanced tuck to straddle far too big a leap, and adds in-between stages: a one leg with the bent foot at the knee of the straight leg, then at its ankle.
Take the one leg first unless your hips like a wide straddle. If you are stuck after a long advanced tuck, Low's answer to that case is to stretch the straddle or move the legs out from the advanced tuck a little at a time.
The first jump, tuck to advanced tuck, changes your back, hips and lever all at once. The tuck to advanced tuck guide breaks it into smaller steps.
What do you need before you start?
You need three things, plus a decision. If you are still weighing up your first big skill, read front lever or planche first.
- Pull-up strength. Aim for 3 sets of 8 strict pull-ups. The Overcoming Gravity charts place the bar pull-up at level 3 and the tuck front lever at level 4. The author of a thread on 2.5 years of front lever work regrets skipping this base.
- An active hang. Straight arms, shoulders pulled away from your ears, 10 to 15 seconds at a time. This is the shoulder position of every step. See active vs passive dead hang.
- A hollow body. 3 sets of 20 to 30 seconds with your lower back on the floor. See the hollow body hold.
How should you train the front lever?
Train it two or three times a week, early in the session, with long rests. Low uses 3 full body sessions a week for beginners and 3 to 7 minutes of rest between strength sets. The detailed account above used 2 lever days a week. A session built from those sources:
- Main hold, at your current step. Hold for about 60 to 70 percent of your clean max, the range Low sets for isometric work. His examples: a 10 second max means 6 sets of 7 seconds, and a 20 second max means 4 or 5 sets of 13 seconds. Rest 3 to 5 minutes. Retest your max every 2 weeks or so.
- Front lever negatives. From an inverted hang, lower through horizontal with straight arms at the next step up. Low's guideline for eccentrics: 2 to 3 sets of 2 to 3 reps at 3 to 5 seconds, 3 minutes of rest, building toward 7 to 10 seconds.
- Front lever pulls. From a hang, raise your body with straight arms at your easiest clean step, and lower it the same way. Low lists pulls, rows and eccentrics as the dynamic work for this hold. The account above used 3 sets of 3 to 6.
- Rows or weighted pull-ups. 3 sets of 6 to 8. Low usually likes weighted pull-ups alongside the holds.
Take an easy week after every 4 to 8 weeks of work, the cycle length Low gives. When a lifter stuck on a 10 second straddle reported 4 straight months of training, his first suggestion was a deload.
How long does it take to get a front lever?
Roughly 6 months for a strong, light athlete. One to several years is just as normal. No study has measured this, so the numbers below are self-reports. They also skew toward people who succeeded.
- 6 months of focused work from a 10 second advanced tuck, at 175 cm and 73 kg (5'9", 160 lb), in one reply.
- 4 to 7 months for the detailed account above, at 170 cm and 72 kg (5'7", 158 lb), after a lifetime of lifting.
- Just under a year to 5 seconds, for someone who started at 61.
- Over a year and still on the one leg, for an athlete at 188 cm and 79 kg (6'2", 175 lb) with a strong lifting base.
- 3 years to reach a 3 second hold, in another thread.
Frequency is the part you control. In a thread about zero progress after 2 years, the poster had 30+ pull-ups but trained the lever as little as once a week. Replies asked about his routine, his exercises and a form video before anything else. Fast claims deserve a second look too: one reply noted that people who get it fast often have bent arms, or a body that is not level.
What are the most common front lever faults?
Bent arms, at any step. The elbows soften as the hold gets hard.
- Cue
- Lock the elbows, then press the bar toward your hips.
- Why
- A bend hides load. Low told one lifter that even a slight bend can leave you 5 to 20 percent short of the real hold.
- Drill
- End the set at the first bend. If it comes before 5 seconds, drop one step and hold there, 5 x 5 seconds.
Back rounding in the advanced tuck. The back curls as you tire, and the hold slips back into a tuck.
- Cue
- Chest open, shoulder blades pulled down, back flat like a table.
- Why
- The curl brings your legs closer to the shoulders, so the hold gets easier and the clock lies.
- Drill
- Flat-back tuck with the knees still in, 5 x 5 to 8 seconds, then let the knees drift out a fist's width.
One leg setup that twists. The hip of the straight leg drops, and the body turns toward it.
- Cue
- Both hip bones level, belt line parallel to the bar.
- Why
- Only one side carries the long leg, so the pelvis wants to rotate. A twisted hold loads one side more and overstates your strength.
- Drill
- Start with the bent foot at the knee of the straight leg, 3 x 5 seconds per side. Switch legs each set and film from the front once a week.
Hips dropping. On the longer steps, the hips fold below the line from shoulders to ankles. The causes are covered in why hips sag in the front lever.
- Cue
- Squeeze your glutes and keep your ribs down.
- Why
- The sag is your body shortening a lever it cannot hold yet, so those seconds belong to an easier step.
- Drill
- Count flat seconds only. Stop at the first drop and do your remaining sets one step down.
When do your elbows or shoulders need a break?
Muscles adapt before the tissue that connects them. Low writes in his article on tendonitis that connective tissue is slower to heal, which leaves it open to overuse, and straight arms put the biceps at maximal length. A meta-analysis of tendon loading found stiffer tendons after programs of 8 weeks or more, though it only covers the Achilles and patellar tendons. In a 2021 survey of 93 street workout athletes, 62.4% reported an injury in the past year, tendinopathy was the top diagnosis, and more than half of the injured blamed overtraining.
Some soreness is ordinary. Low calls soreness around the triceps, near the shoulder, fairly normal in people new to front levers. His fix is to back off pulling for a while and build up slowly. The detailed account above is the warning: golfer's elbow stopped that athlete's lever work for a long stretch, and he lost the hold.
See a physiotherapist or doctor if:
- You feel a sudden pop or a sharp pain at the elbow, the biceps or the shoulder.
- Pain lasts more than 2 weeks after you cut the load.
- The joint swells or bruises, or your shoulder catches or feels unstable.
- You feel numbness or tingling in your arm or hand.
- Pain wakes you at night, or gets worse even with lighter training.
More on both joints in elbow pain in calisthenics and shoulder pain in calisthenics.
How do you check your step on video?
Film from the side, phone level at about hip height, 3 to 4 meters (10 to 13 feet) away, your whole body and the bar in frame. Check three things on the footage: elbows straight, hips on the line, body still. You can also pick your step in CaliLens, from Tuck to Full, and film the hold to have it scored. For light and framing, see how to film a calisthenics form check.
Frequently asked
Is the straddle or the one leg front lever harder?
It depends on how wide your legs go. A very wide straddle usually feels easier than one leg out, and a narrow straddle feels harder. If your hips dislike the width, the one leg is the simpler step to use and to measure.
Can I learn the front lever with a resistance band?
Yes, as one tool among others. A band under the hips or feet lets you feel a long position early, but it helps more than it seems to. Keep your main progress measure on an unassisted hold, and drop to the lightest band that keeps your line.
Do I need rings or parallettes for the front lever?
No. A sturdy pull-up bar high enough to clear your legs is all you need. Rings can feel kinder on the wrists and elbows because they turn with you. Low parallettes let you start close to the floor.
Does body weight or height change how fast I get it?
Yes. Longer legs and a heavier lower body add load at every step past the advanced tuck. Taller athletes often stay longer on each one. That is a reason to measure your own clean seconds and to ignore the timelines of lighter or shorter athletes.
Can I do a front lever without being able to do many pull-ups?
A tuck hold, yes. Getting much further usually needs more pulling strength, so pull-ups and rows stay in the plan. High reps are not the point, though: strength at low reps carries over better than a long set of 30.